

Hatching out high schoolers
A poultry project

As a small poultry producer - so small I even call myself a hobbyist instead of producer, I always struggle to engage others in my vision and projects. Others being family members, friends, other hobbyists I trade with, or even random strangers… those poor unfortunate souls usually glaze over by the time I get through sex-linked ducklings and way before I get to the evils of factory farming. When I do find a kindred soul, it’s refreshing to see the same sparks of passion and admire the work others have put in, even if it’s a topic or animal different from mine.
This past year I was able to stretch my wings (intended) in a new way based on my high school-age son and one of his favorite teachers. Apparently, the gift of gab can be genetic and he’d been filling her ear most days with the tales of my flock and projects. He connected us and this teacher of Science (Biology and Anatomy & Physiology) approved a hatching project using my ducks’ eggs during the Spring. I planned to be in class several periods a day, most days of the school week and take the incubator home over the ten days of spring break since no one would be there to check on it.
Unfortunately, only a few of the eggs began to develop and none even got close to hatching. We were all a bit bummed, but I brought my incubator home and went back to the drawing board. I learned a lot of tips and tricks, purchased a Bluetooth temp/hygrometer for inside the incubator and even purchased a second incubator. I went on to hatch out my goose, duck and turkey eggs in several batches over the summer and solidified my status as a hatch addict. My family has gotten used to simultaneous bators running, egg storage and labeling, candling in the dark of night, and - their favorite part - eggs hatching and babies in the brooder.
So when I contacted this teacher again about hatching for the fall classes, she agreed readily with one request - that they be chicken eggs instead of duck, one less week of incubating and chickens are easier to care for (unless we get into that discussion again, I disagree). Since I don’t keep any chickens, I searched for local chicken folks with fertilized eggs. I had to settle for barnyard mixes since most breed producers had shut down production for the season. She selected her earliest Biology class as victims-er, students, and we planned for a hatch the week after Thanksgiving break. This time was a success with 14/22 hatching and one quitter for the A&P class to learn from (details below). These experiences are always very fulfilling to me, as I hope they are for the students, and I’m sure I end up learning more than they do every time.
So, what does this have to do with you? I was hoping you’d ask yourself that and aim for this post to be an encouragement and resource for you, but more importantly a launchpad for your ideas and goals with poultry.
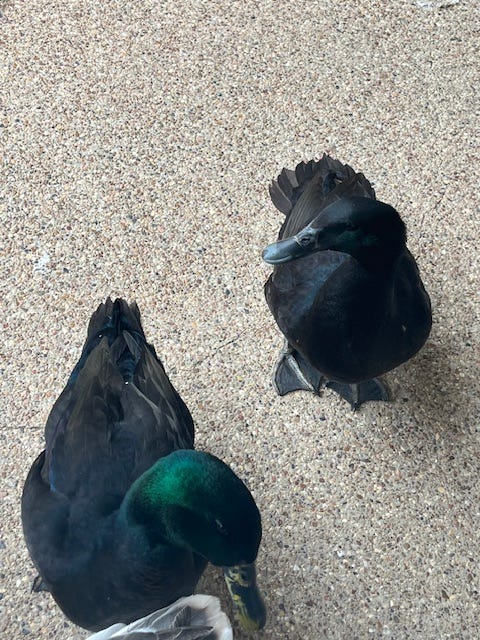
But I’m not a teacher. This one is actually one of the easiest hurdles to overcome. I’m not a teacher or a lecturer, either. My teaching style is to demonstrate as much as possible (with hands on if possible) my skills and experiences and ask a lot of questions of the students. No one enjoys sitting in a presentation where the teacher READS from the screen behind them. We can read, that’s why we’re here… If you like to have notes or a lecture, print them out for the students and let them take their own notes. Let them have the benefit of your presence as experiences and Q&A vs you reading out loud to them. I have learned so much more by listening to the students’ ideas and discussing with them than if I droned on up front. When talking about ducks, my favorite thing to do is to take a few juvenile or adult ducks (bonus points if they look basically the same like my Cayugas) and ask the students to pick them up and determine if they are male or female. Inevitably, the students decide the “loud” duck is the male, as they’ve been conditioned to do because of roosters, for example. Once I explain that the quack is actually distinctive to females (if you ever played Duck Hunter, you were shooting all of the females!), I ask them why they think it’s important for the females to be much louder than males. My favorite response so far and one that I really agree with, was a student saying, she needs to be loud to call her babies and protect them. I always walk away from these hatches with loads of ideas and thoughts, as I hope the students do as well.
Get in contact with your local school and offer to volunteer for a few weeks during the hatch. I am hard pressed to think of a school that would reject an adult wanting to invest in their students. My preferred age group is high school, since they are able to focus a lot better than younger students and are beginning to think about what’s after high school (or should be). That’s why I titled this post ‘hatching out high schoolers’ as a metaphor for helping our youth kick out of their shells and face the world.
Don’t overlook homeschooling groups or families, either, they are usually open to non-traditional methods of learning as well as skills and hands-on experiences that develop their students.
Students today have infinite information available anytime at their fingertips, but they need to be able to determine what is truth in this age of Artificial Intelligence, ‘content creators’, Influencers and Deep Fakes. They also are lacking in most experiential types of learning, since it’s all classroom knowledge without hands-on, the ability to brainstorm, try things, make a few mistakes, and have a mentor to guide them.
Another thing I try to do is take all of my own materials as much as possible, plan each session carefully, and clean up after myself and the students. Teachers have a lot on their plates to provide their own ideas, curriculum, materials, etc. so any little bit helps especially if they don’t have to plan for these activities.
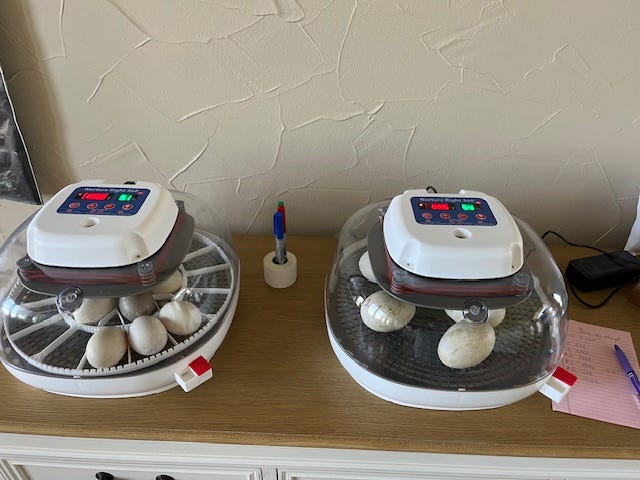
Sample schedules and resources: Remember to coordinate your schedule based on how long things take to hatch (chickens 3 weeks, turkey/duck 4 weeks, Muscovy duck/geese 30+ days), weekend/holiday breaks and setting your eggs early in the week so you don’t have hatchlings over the weekend. Some eggs require more work and maintenance, so are ideal for experienced hatchers, for example turkey eggs too large for the automatic turner tray or goose eggs that need to be misted and cooled every day.
The hens get off the nest to stretch their legs and perform bodily functions (especially in the beginning-they are more committed closer to hatch times), so it’s okay to open the incubator to candle eggs or unplug it long enough to take it between school and home. Find a good spot in your home and at the school that is draft free and relatively mild in temperature. I learned during my failed hatch that the incubator on a table in the middle of the room where the HVAC shut off every day overnight was too cold for eggs to develop. For the second hatch, I put the incubator under cabinets in the same room and on top of a dish drying pad with a Bluetooth meter inside to check the settings. You don’t want your incubator having to work too hard to stay warm, or the temperature fluctuations will affect the eggs. I try to only open the incubator once daily and work quickly. If I have multiple class periods, they get to candle on different days starting when you can see development (First period Monday day 7, Third period Tuesday day 8, etc.).
Day 1: Take incubator to school, get set up and settings adjusted. Discuss types of incubators (cabinet/tabletop, forced vs still air), temp/humidity/ventilation requirements for hatching, Why Poultry? (rapid growth, small size, eggs, meat, feed-to-meat conversion, feathers for clothes/blankets/lures, litter as biofuel).
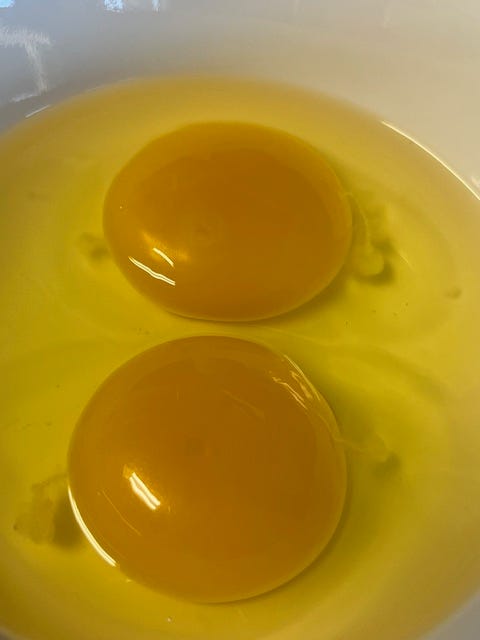
Day 2: Take fertile eggs to school, candle to check for breaks and air cells, create a Hatch record, set eggs, turn tray and timer, assign an incubator monitor. Discuss ideal eggs for incubating (fertilization, shape/size, shell integrity, unwashed/unrefrigerated/not shipped). Discuss how candling works and what to look for in these early stages where there is no visible development. I usually take extra eggs or the rejects from the selection process for students to crack open. Let the students do this - you’d be surprised at this life skill that several students have not done before! Take a graphic that shows the difference between fertilized and non-what I call ‘Dot or Doughnut’ and have them compare to the real egg yolks to decide for themselves. I always remind them that it’s not clear cut and practicing often is the only way to develop this skill.
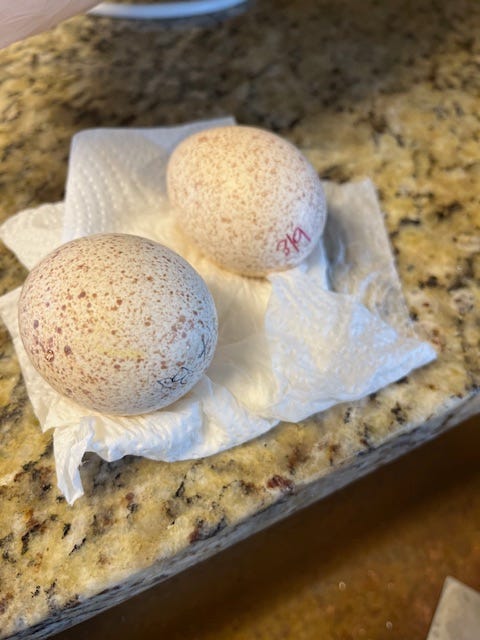
Discuss the importance of good record keeping with the hatch log and mark all eggs. I like to have each student pick an egg and write their name on it. They become invested that way, can see it rotating every day, root for it to hatch successfully, and I never have to bring chicks home. I have used Sharpie and color pencil with the same results, with my preference actually for marker because duck eggs have a slimy bloom and the pencil can rub off. Some of the chicken eggs were very difficult to candle and label (Marans?), so having a set of strategies is best over one way of doing things.
I have one student per period that I voluntell to be an incubator monitor. This is usually a student that is very interested, has a knack with animals/machines, can handle responsibility and make decisions for the group. Their job is to daily check the temp and humidity, adjust accordingly, handle the eggs during candling, etc. I contact local Universities or Ag programs and ask for swag for the students - my incubator monitors get the best swag for their efforts and bragging rights.
Day 3: Discuss types of poultry (land/water/ornamental). Discuss breeds (egg/meat/pet production). Discuss Conservancy (factory farming, reliance on 12 crops and 5 types of livestock). Bring eggs, cups and vinegar to make vinegar eggs (they need to sit for 3-4 days). Discuss the action of the vinegar on calcium carbonate, why laying birds need supplemental calcium, the vinegar will even clean the bloom off and it floats to the top.
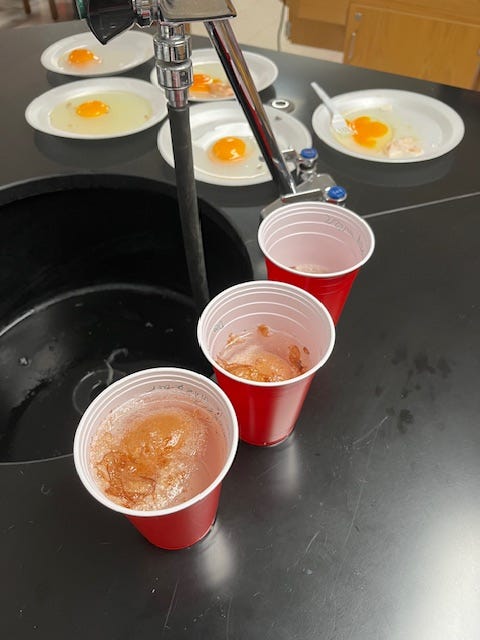
Day 4: Discuss Farm vs. Business. Discuss Careers - I take an internship ad from a local food distributor showing all of the parts of the business they get to experience as an intern. Don’t like animals? Work in sales or marketing. Don’t like people? Drive the trucks, etc., there is always something the students can aspire to do regardless of their preferences. Open the vinegar eggs [3-4 days after putting them in vinegar or the shells will still be tough] - this is messy but the students love it. Check fertility again or anything interesting (double yolk/fairy egg/meat spots/bacterial or fungal growth).
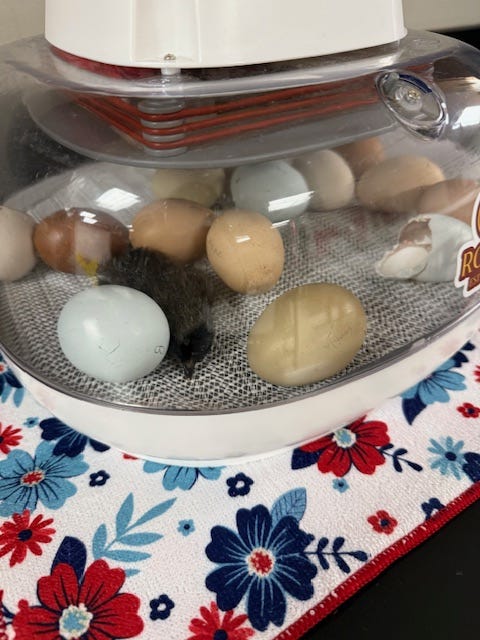
Day 5: Short video on embryo development (chicken, but the concepts apply). Discuss why things happen when they do - why do they develop feathers before hatching? Why do their eyes develop so early on when they’re inside the egg? Discuss the need for an eye tooth, shadowing, internal and external pipping, why the air cell needs to form, yolk absorption right before hatch, the need for the lack of air to cause the chick to kick its way out, etc. If it’s been 7 days since setting, begin the first candling to check for veins. Throw out any duds (not fertilized) that don’t start developing. Ideally this is done in a darkened area or room and sometimes a small flashlight is better than the candlers on the incubator.
Don’t forget to make notes in your hatch log each time you candle! Discuss why records are important (flock planning, goals, disease, infertility, drops or problems in production).


Day 6: Discuss nesting/brooding/basic needs for young then adult birds. If students want to take chicks home, they are required to write, draw, interpretive dance, whatever, a project on caring for the birds. Parent permission is key, as well as understanding the responsibility and needs of the birds. Baby birds cannot go alone, I send groups of two or more based on what hatches successfully. Keeping a lone chick alive is very difficult, especially for beginners. 10-14 days before hatch are usually needed for the students to plan their project report.
Day 7: Lockdown for the incubator (turning tray out, increase humidity, candle once more to check for quitters, add shelf liner to incubator floor, open vents). This happens 3-5 days before the expected hatch date. Discuss how the hen prepares for the hatch (rarely gets off nest, begins peeping to the chicks, hatchlings and mom will stimulate eggs to hatch all around the same time - why?). If you feel up to it, crack open the quitters and try to determine what day they stopped developing, which can be the answer to why it stopped. I have done this inside a ziploc bag so I can still see what’s inside without risking a stink bomb. I also have started adding plastic shelf liner cut in a circle to the incubator when I take the turn tray out and prepare for hatch; it doesn’t keep the incubator any cleaner, but prevents toes and beaks from getting caught in the slots.
Day 8: You should start seeing signs of hatching (shadowing, internal pip, external pip, zipping, hatch). If you need to candle at this stage, use a flashlight held up to the egg without turning it or removing the egg from the incubator. The eggs should right themselves with the biggest part of the air sac on top if they are jostled, if the sacs formed properly. Work quickly while the lid is off to prevent a lot of heat/humidity loss on the eggs. Chickens and turkeys progress rapidly through hatch stages while ducks can take a long time. Discuss stages of hatching, not removing hatchlings until they are dry and fluffy, yolk absorption and how chicks can survive a few days on it without food and water, hatchlings and hen stimulate the eggs to hatch around the same time - why? and what happens if eggs don’t hatch at the same time. If you need to remove a struggling chick, work quickly with help to remove the chick [and a buddy if you won’t be returning the chick to the incubator] and empty eggshells. The empty shells contain stinky afterbirth and generally just add to the mess, unless you are saving them to send off for dna testing.
Note each chick/egg in the record log as accurately as possible. Discuss the importance of records of hatch success, time, if struggle or not, etc. as it relates to flock management.
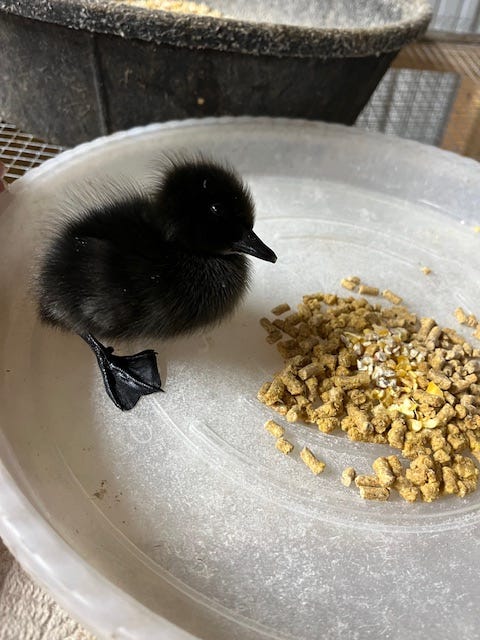
Day 9: ID each bird (discuss methods: toe punch, banding, wing bands, record keeping). Each bird now gets their own medical record moving forward, which can include their hatch record if available. Discuss genetics (some of my favorite poultry genetics topics are: color genes [usually come from the male], eggshell color genes [likely from the hen, but if it’s tied into feather color, then does it come from the male?], dominant/recessive genes, etc). Baby birds need to go as groups to homes that are prepared for brooding: heat, containment, substrate, food and water. Troubleshoot as needed: hatching issues [do you get involved in difficult hatches?], medical issues [deformities, bleeding umbilicus, etc.]. I haven’t dealt with these types of issues in the classroom, but I have on my own hatches, and I highly recommend to include students in the decision making process if the opportunity presents itself. There is no better teacher than experience, and experiences are always better with a mentor present.


Approved students get to take home chicks (in groups) at the end of the day. I take a box with a pee pad, Hot Hands underneath, vitamin water and my chick power starter* so they can hang out with the students and be taken home at the end of the day. I do have to say, though, that most of the day they get held by students and rarely spend time in the box! The chicks can also be put back into the incubator overnight to stay warm if needed or if other eggs are still hatching, even though after having food and water they will poop in the incubator**. I show my students how to dip beaks and bills in vitamin water when they exit the incubator and check for them tipping their head back and swallowing to make sure they get some nutrition in early on.
Don’t be afraid to go out and start a hatching project - it benefits you in many ways: investing in our youth and future producers, helping rare breeds survive and duplicate, ensuring genetic diversity and our food supply, etc. Feel free to comment with your thoughts and experiences, and as always,
Happy Hatching!
Footnotes & Resources:
Chicks in the Classroom project by the Livestock Conservancy - documents, schedules, videos [elementary school age]
*Chick power starter: Mix chia seeds, ground flaxseed, turmeric, nutritional or Brewer’s yeast, and a few sprinkles of crumbled Dulse seaweed. In a pinch, you can also scramble an egg as chick food, but very young hatchlings may struggle to eat it. You can also moisten what your flock currently eats (I never buy crumbles as it is mostly dust and wastes my $$, I only use pellets). Remember that poultry will need access to grit relatively soon to aid their digestion, especially if they aren’t allowed to free range and pick up their own grit.
**My least favorite aspect of hatching is cleaning the incubator! They get really nasty between little bitty feathers, bits of shell, afterbirth, poo and other stinky things of undetermined provenance. After a few rodeos, I have resorted to doing the same cleaning process with the same products: Soak well with Clorox bathroom spray the bottom and trays. Clean the inside & outside of the top with canned air (especially the fan/motor and wipe with Q-tips if the feathers are reluctant to be cleaned) followed by a thorough wiping with Clorox Wipes. Gently wipe and clean the fan/motor casing and the hygrometer tip. Allow to air dry. Scrub the soaked parts with an old rag and rinse with very warm water. Scrub the channels for water, water ports and port covers very well with an old rag and Q-tips if necessary. You need to remove hatching ick as well as mineral buildup from the water. Allow to air dry completely. Lubricate the turner stile and tray slot with a neutral oil (clipper/sewing machine oil). This will prevent rust and help the tray pop out easily. Wipe down the cords and charger gently with Clorox wipes. Once everything is fully dry, put it away for the next hatch or go ahead and set more eggs [the preferred method].
Materials: Eggs [a lot! My incubators handle 22 small eggs in the turner tray, less if they are bigger and need hand turning like turkey/goose]. Incubator [your choice, I suggest starting small and with a clear top instead of the styrofoam kinds]. Distilled water for humidity. Bluetooth temp/hygrometer [I have been pleased with a Govee available on Amazon which sends readings to an app on my phone]. Towel/pad for transporting the incubator and underneath. Printed notes, graphics, a way to watch videos on screen. Vinegar eggs: Eggs [different kinds, no need to be fertilized], vinegar, Solo cups, 3-4 days, disposable plates, something to poke open the eggs [plastic utensil], a big trash bag. Brooder, vitamin water, chick food. Masking tape to close the incubator during transport. Sharpies, mechanical or colored pencils. Plastic gloves for opening or handling eggs. Flashlight or incubator candler. Hatch logs or records. Zipties/bands/toe punch. The most critical material needed is your willingness and experience.